I get this question a lot! Everyone downloads things and they forget where they downloaded it to. We can NEVER find it! Then when you do, you have a folder with download,download 1, download 2, download 3, and so on. Sound familiar? (I can see my mom shaking her head uh huh!)
First let’s take a look at where the downloads should go by default. If you are using chrome from Google, click on the three little dots at the top right just under the X you use to close it.(My chrome looks different than yours may be due to customization.)

Next click on Settings;

Now you have the settings page for chrome open. Scroll all the way down to the bottom and click on Advanced.

This opens up more options for you to change. Scroll to the Downloads section. It shouldn’t be too far down if it is not already showing for you. This shows you that the default download location is C:\Users\”Your Name”\Downloads
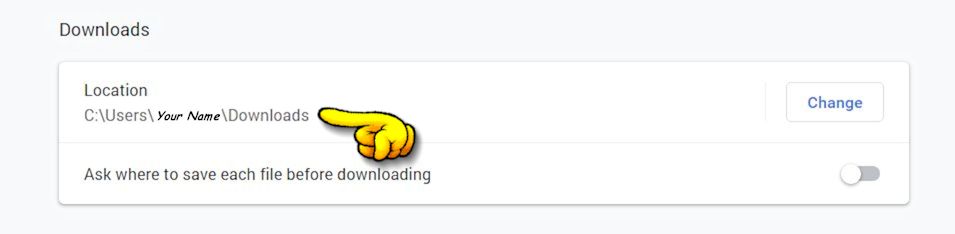
This is where all downloads will go after you click that download button. So what does C:\Users\”Your Name”\Downloads mean? Basically, without getting to much into file paths, this means that the downloads will go into a folder named Downloads in your Documents folder. Normally it is best not to change this as it points to a stable place where everyone who uses the PC can find their downloads. But, if you have a hard time finding things it’s a P.I.T.A. (Pain in the you know) So let’s make this easier for you to find!
We are going to create a shortcut on your desktop to this folder so you can always find it when you need it. There are several ways to do this but we are going to do the “copy and paste” method. I find for most people this is the easiest way to do this. (Not to mention that when you tell your kids or others that you created a shortcut on your PC they are in awe of your PC skills!)
The next step is to go back to that settings page and left click just behind the text C:\Users\”Your Name”\Downloads and drag your mouse over all of it until it turns blue, or highlights that text. It should look like this;
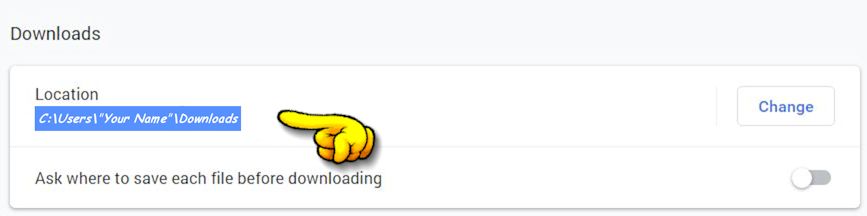
After you have this highlighted let go of the mouse and press the CTRL and C keys on your keyboard. It works best if you hold down the CTRL key and press C. This copies that text to your PC’s clipboard.
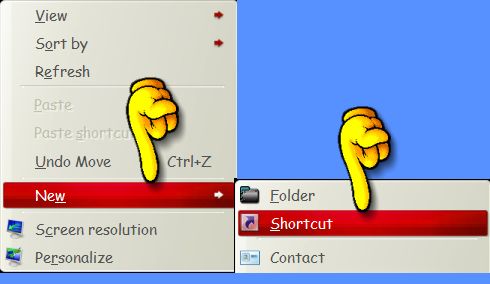
Next we will go to your desktop. Here we are going to make a new shortcut to point to the downloads folder. Right click on any empty part of the desktop and select New, then Shortcut. (Again, mine will look different but the text will be the same)
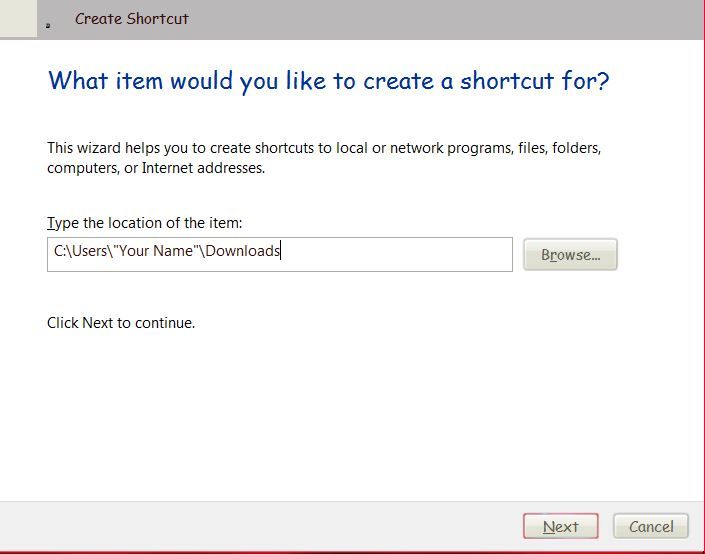
This opens the window to create the shortcut. Next click inside the box and on your keyboard hold down the CTRL button and press V. This will “paste” the text we copied earlier into the box.
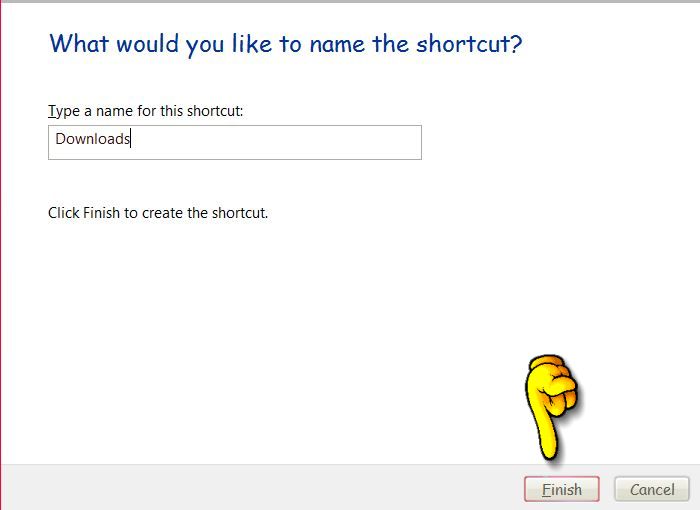
Kinda cool huh? Click on next at the bottom and it will ask you to type a name for this shortcut. Type Downloads or My Downloads, whatever you want to call it into the box and click on Finish.
The box will close and you will have a new “folder” on your desktop. If you click this, it will take you right to your Downloads folder without having to search or click on My Documents first. So much easier right? Now, each time you download a file you can click this icon on your desktop to go right to the downloads folder.
Thank you for reading my How to download and find it tutorial!
If you would like to test this, you can download my sample file. This is a small zip file that you can open and read or just delete. It will just show you that the download went to the correct place and by using our new shortcut, you don’t have to worry about where it went!
To download my sample file and test your new shortcut click this link